Crafting Custom Resource Types
Crafting Custom Resource Types
In this guide, we're going to walk through the steps to create your own custom resource types in Massdriver. This is for those moments when the existing definitions just don't cut it for your unique needs. Let's demystify the process and make it as straightforward as possible. And, just in case you're looking for a primer on what resources and resource types actually are, make sure to check out the Resources & Resource Types concepts page.
How to Create Your Own Custom Resource Type
Step 1: Spotting the Need
Check out the Massdriver resource types GitHub repo first. If what you need is nowhere to be found, that's your green light to craft something custom.
If you're setting up a self-hosted Massdriver instance, check out the Massdriver Catalog. It includes example resource types for common infrastructure patterns (networks, databases, storage) that you can customize for your organization. This is a great starting point for designing your platform's resource type contracts before implementing infrastructure code.
Step 2: Getting Started
With the Massdriver CLI, you've got the toolkit you need to forge your own definitions. It's usually easier to tweak an existing one than to start from scratch:
- Pick a Starting Point: Hunt down an existing resource type that's close to what you need, or use this starting template:
{
  "$md": {
    "name": "artifact-definition-name"
  },
  "type": "object",
  "title": "Resource Type Name",
  "description": "",
  "additionalProperties": false,
  "properties": {
    "authentication": {
      "title": "Authentication",
      "type": "object",
      "properties": {}
    },
    "infrastructure": {
      "title": "Infrastructure",
      "type": "object",
      "properties": {}
    }
  }
}
- Make It Your Own: Copy its content into your favorite editor (like VS Code) and start tweaking it to suit your requirements.
Step 3: Key Components of a Resource Type
Structure your resource type to match your infrastructure abstraction. Group related properties logically and use $md.sensitive: true to protect sensitive fields like passwords and tokens.
Step 4: Tailoring Your Definition
- Define Your Structure: Add properties that match your infrastructure needs.
- Mark Sensitive Fields: Use
$md.sensitive: truefor passwords, tokens, and other secrets. - Prune What You Don't Need: If the copied definition includes irrelevant bits, cut them out or alter them.
By the end of this step, your definition should look something like this:
{
  "$md": {
    "name": "artifact-definition-name"
  },
  "type": "object",
  "title": "Resource Type Name",
  "description": "",
  "additionalProperties": false,
  "required": [
    "infrastructure",
    "authentication"
  ],
  "properties": {
    "infrastructure": {
      "title": "Infrastructure configuration",
      "type": "object",
      "required": [
        "foo",
        "bar"
      ],
      "properties": {
        "foo": {
          "type": "string",
          "title": "Foo",
          "description": "Foo description",
          "examples": [],
          "pattern": "^.*+$",
          "message": {
            "pattern": "Must be a valid format for foo."
          }
        },
        "bar": {
          "title": "Bar",
          "description": "Bar description",
          "additionalProperties": false,
          "examples": [],
          "type": "string"
        }
      }
    },
    "authentication": {
      "title": "Authentication configuration",
      "type": "object",
      "required": [
        "token"
      ],
      "properties": {
        "token": {
          "title": "Token",
          "type": "string",
          "$md": {
            "sensitive": true
          }
        }
      }
    },
    "iam": {
      "title": "IAM",
      "description": "IAM Roles And Scopes",
      "additionalProperties": false,
      "patternProperties": {
        "^[a-z]+[a-z_]*[a-z]$": {
          "type": "object",
          "required": [
            "role",
            "scope"
          ],
          "properties": {
            "role": {
              "title": "Role",
              "description": "Cloud Role",
              "pattern": "^[a-zA-Z ]+$",
              "message": {
                "pattern": "Must be a valid Cloud Role (uppercase, lowercase letters and spaces)"
              },
              "examples": [
                "Data Reader"
              ]
            },
            "scope": {
              "title": "Scope",
              "description": "Cloud IAM Scope (cloud resource identifier)",
              "type": "string"
            }
          }
        }
      }
    },
    "cloud": {
      "type": "object",
      "properties": {
        "region": {
          "type": "string",
          "title": "Cloud Region",
          "description": "Select the cloud region you'd like to provision your resources in."
        }
      }
    }
  }
}
Step 5: Publishing to Massdriver
Got your definition looking sharp? Use the mass definition publish /path/to/definition.json command in the CLI to send it out into the world.
Step 6: Fetching Your Masterpiece
Once published, snag your resource type with the mass definition get org/definition-name command to confirm it's ready for action in your bundles.
Step 7: Using Your Custom Resource Type
Now that your custom resource type is published, you can use it in your bundles. Just reference it in your bundle's artifacts: field (the YAML key remains artifacts: for backwards compatibility) and structure your _artifacts.tf file, and you're good to go.
When referencing resource types from your own organization, you can omit the organization prefix. Massdriver will automatically use your organization's definitions. This keeps your bundle configuration cleaner and more portable.
artifacts:
  required:
    - artifact_definition_name
  properties:
    artifact_definition_name:
      # Recommended: omit org prefix for your own resource types
      $ref: artifact-definition-name
      # Also valid: acme/artifact-definition-name
resource "massdriver_artifact" "artifact_definition_name" {
  field                = "artifact_definition_name"
  provider_resource_id = artifact_dummy_resource.main.id
  name                 = "Artifact Dummy Resource ${var.md_metadata.name_prefix}"
  artifact = jsonencode(
    {
      infrastructure = {
        foo = artifact_dummy_resource.main.foo
        bar = artifact_dummy_resource.main.bar
      }
      authentication = {
        token = artifact_dummy_resource.main.token
      }
      iam = {
        "read" = {
          role  = "Data Reader"
          scope = artifact_dummy_resource.main.id
        }
      }
      cloud = {
        region = artifact_dummy_resource.main.region
      }
    }
  )
}
To confirm that your custom resource type is working as expected for your bundle, run the mass bundle lint and mass bundle build commands to check for any issues. When you're ready to publish your bundle changes, mass bundle publish will publish your bundle to your Bundle Catalog.
Customizing Massdriver
Customizing Onboarding
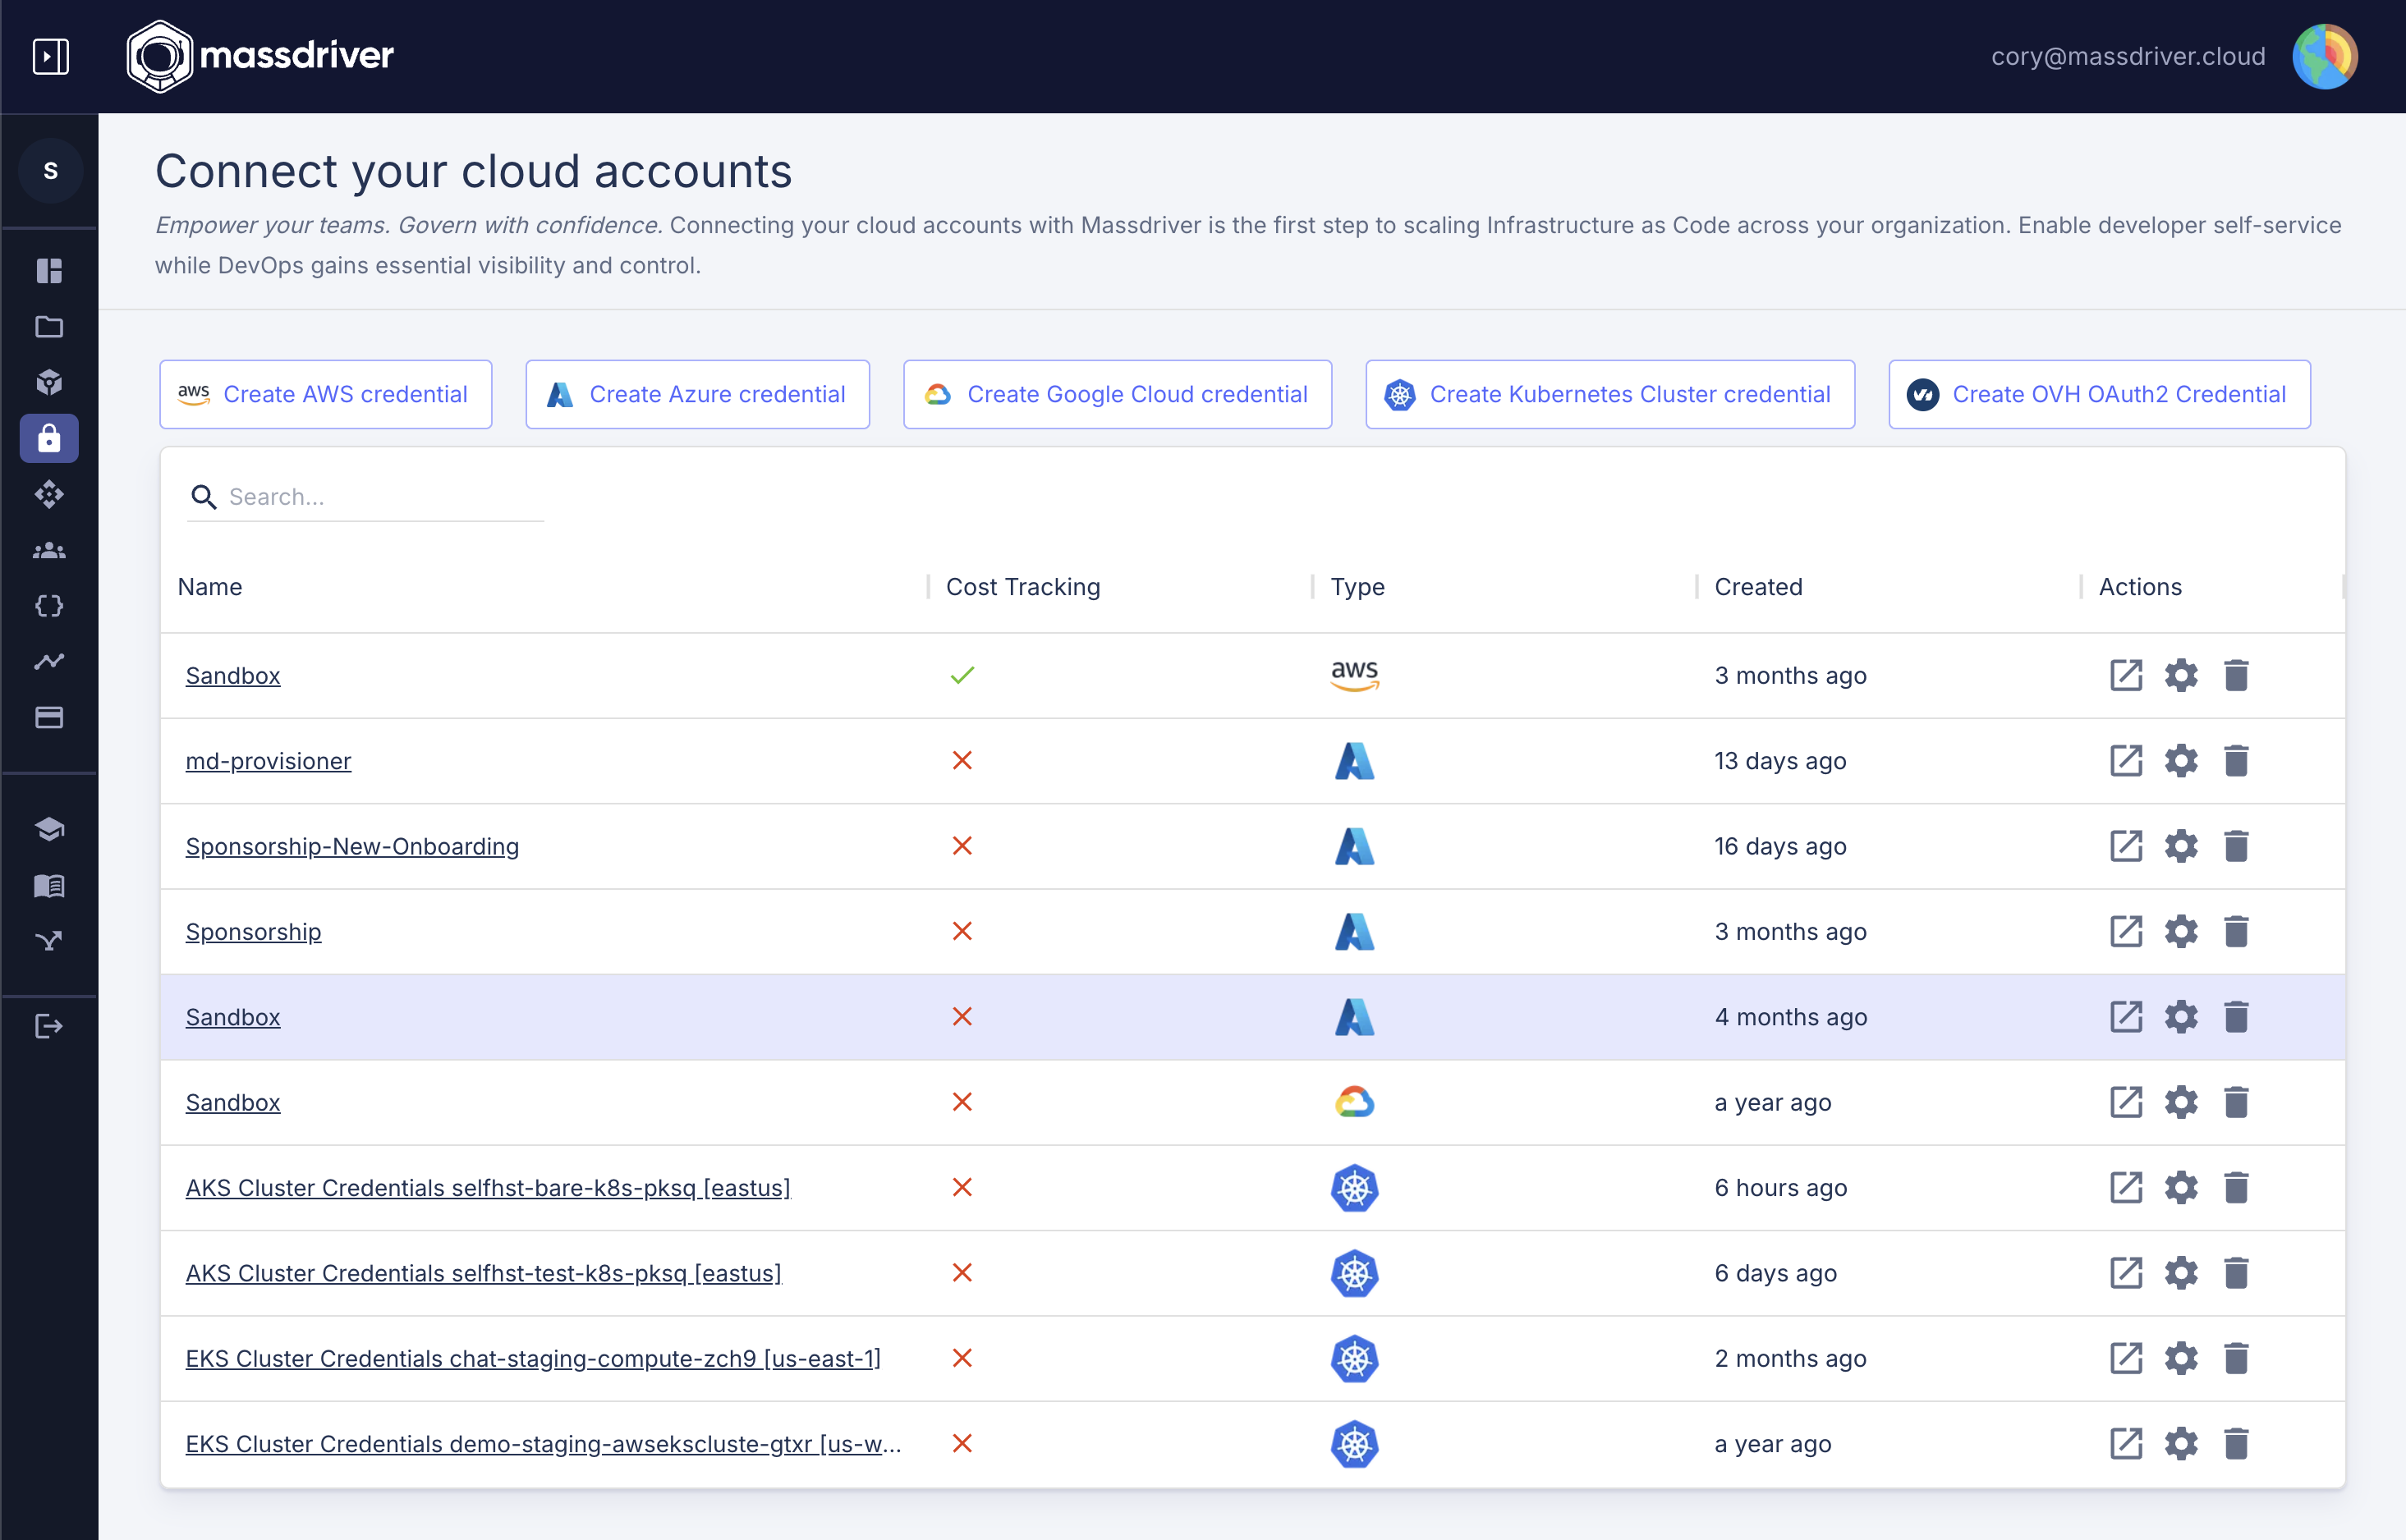
Massdriver lets you fully customize the onboarding experience for cloud credentials and other resource types. You can define onboarding instructions, UI labels, and icons directly in your resource type using the $md and $md.ui fields. This enables you to provide clear, step-by-step guidance for your users when they add new credentials.
For example, the onboarding screen for cloud credentials (see below) is driven by the ui.instructions array in your resource type. Each instruction can include a label and content, allowing you to walk users through complex setup steps with clarity.
Relevant schema fields:
$md.label: Sets the display name for your resource type in the UI.$md.icon: Sets a custom icon for your resource type.$md.ui.instructions: An array of onboarding steps, each with alabelandcontent, shown to users during credential setup.
See a real-world example of onboarding instructions in the aws-iam-role resource type.
Note on Icons and Instructions
Currently, icons (as data URLs) and instructions.content (as base64-encoded markdown) are packed directly into the JSON Schema. With our upcoming move to OCI for resource types (as we've already done for bundles), you'll soon be able to include these files directly in the same directory as your definition—no more packing required. Stay tuned for updates! Here is the script we use for packaging resource types.
Customizing the Resource Types that can be defaulted in an Environment
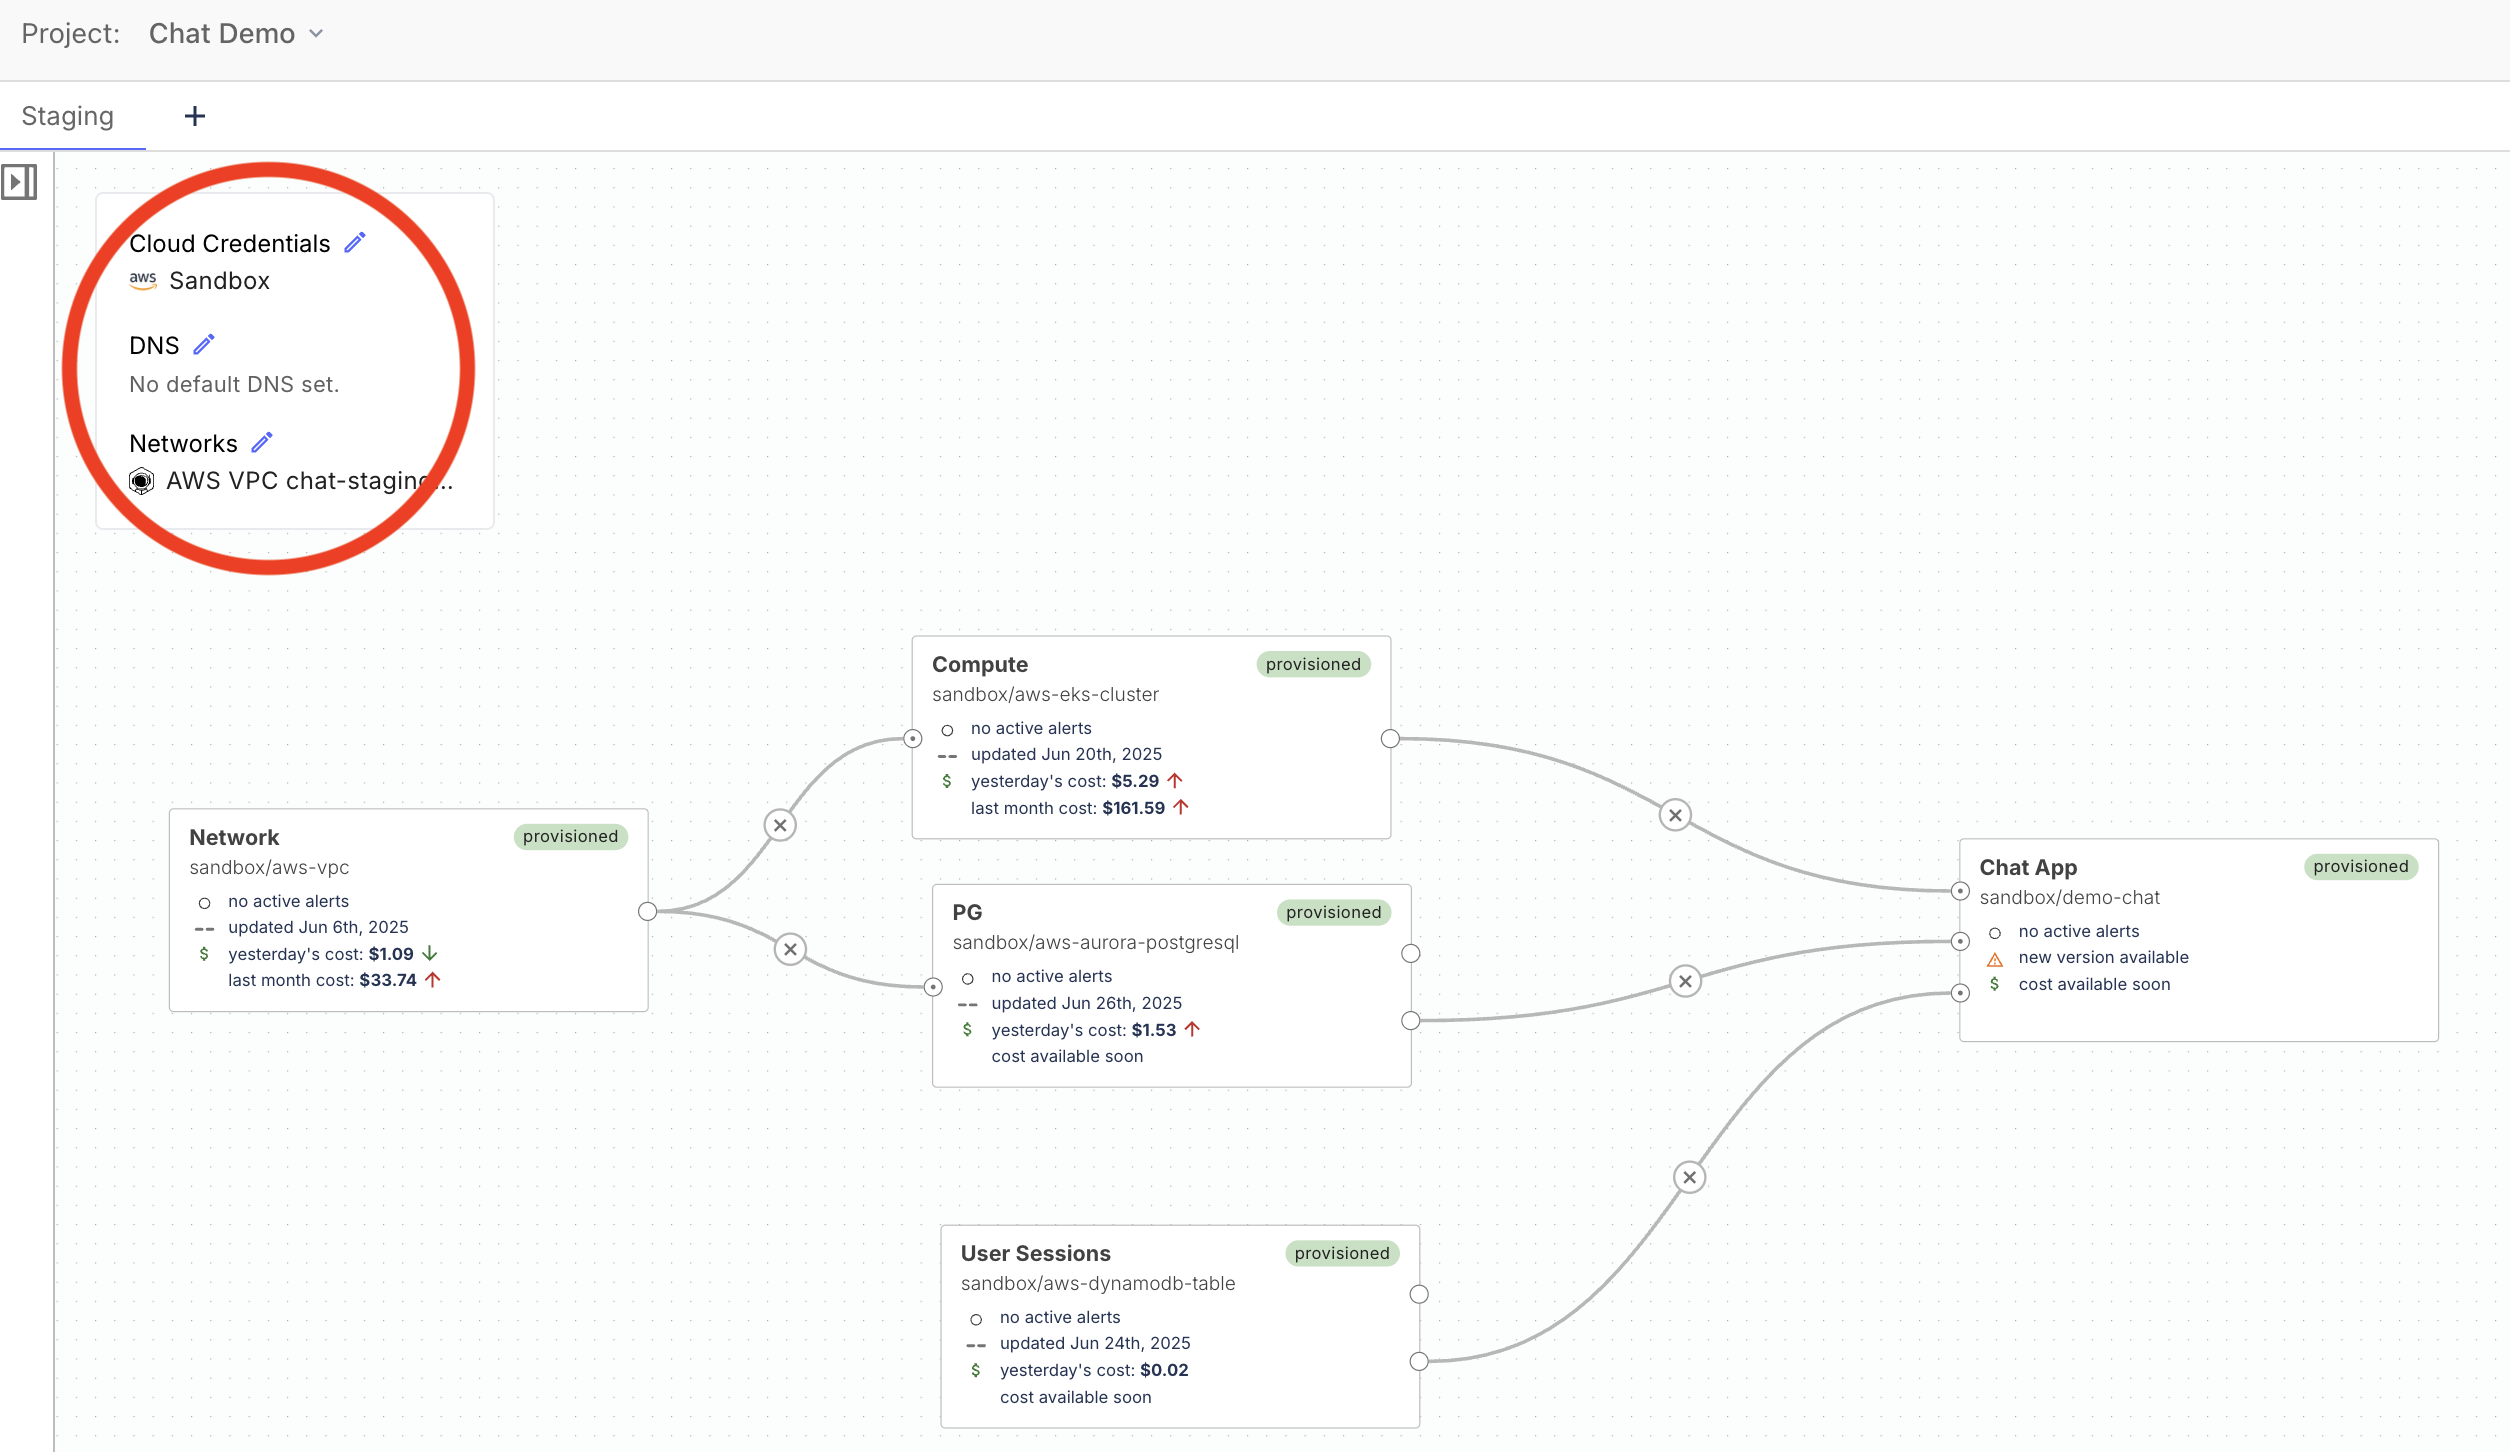
Massdriver environments support "environment default" resources—things like credentials, networks, or DNS zones that are commonly shared across multiple bundles. You can control which resource types are eligible to be set as environment defaults by specifying the ui.environmentDefaultGroup field in your resource type.
When you set this field, your resource type will appear in the environment overlay, allowing users to assign a default resource for that group (e.g., default network, default credentials) without having to connect it individually to every bundle. This streamlines environment setup and reduces visual clutter in complex diagrams.
Relevant schema fields:
$md.ui.environmentDefaultGroup: Adds your resource type to the "environment default" overlay under the specified group (e.g.,networking,authentication,dns). This is what makes a resource type eligible to be set as a default in an environment.
Note: There is a special 'magic' environment default group called
credentials. Assigning your resource type to this group will make it appear on the credentials page and enables Massdriver to fetch credentials for use in your workflows. Besides that you can use anyenvironmentDefaultGroupname that makes sense for your team.
See a real-world example of adding an environment default in the aws-vpc resource type.
$md.ui.connectionOrientation: Controls how resources of this type appear on the canvas. If set to"link", users can draw lines to connect bundles to the resource. If set to"environmentDefault", the resource is only shown as a default and not as a connectable box. These options are independently controllable, so you can allow both defaulting and explicit connections if desired. For example, SREs might want to draw lines to a shared Kubernetes cluster, while end developers only see it as a default and don't interact with it directly.
Example snippet:
{
  "$md": {
    "name": "aws-iam-role",
    "label": "My Cloud Credential",
    "icon": "https://example.com/my-icon.svg",
    "ui": {
      "environmentDefaultGroup": "authentication",
      "connectionOrientation": "environmentDefault",
      "instructions": [
        {
          "label": "Step 1: Create a Service Account",
          "content": "Go to your cloud provider and create a new service account..."
        }
      ]
    }
  }
}
References:
- Resource type JSON Schema (the JSON Schema URL retains the legacy filename)
- Open source resource types
By leveraging these schema fields, you can tailor both the onboarding experience and environment default behavior for your custom resource types, ensuring a seamless and intuitive experience for your users.
Wrapping Up
And there you have it! Creating your own resource types in Massdriver opens up a world of customization for your cloud infrastructure projects. By following these steps, you're well on your way to tailoring Massdriver to your project's unique requirements. If you've got any questions or need a hand, don't hesitate to reach out to our team. We're here to help you make the most of Massdriver's powerful features. Happy crafting!